Table of Contents
Overview
In OneStrata, a campaign can have multiple schedule drafts, in order to map out and consider different budgets and tactics during the planning process. These different options can be shared and reviewed with clients, and iterated on until a specific option is approved.
There are three types of schedule options: Draft, Active, and Archived. This page provides information on creating and deleting Draft schedule options.
Create a Schedule Draft Option
To create a new Draft schedule option:
- Open the appropriate media campaign.
- Navigate to the campaign's Schedule tab.
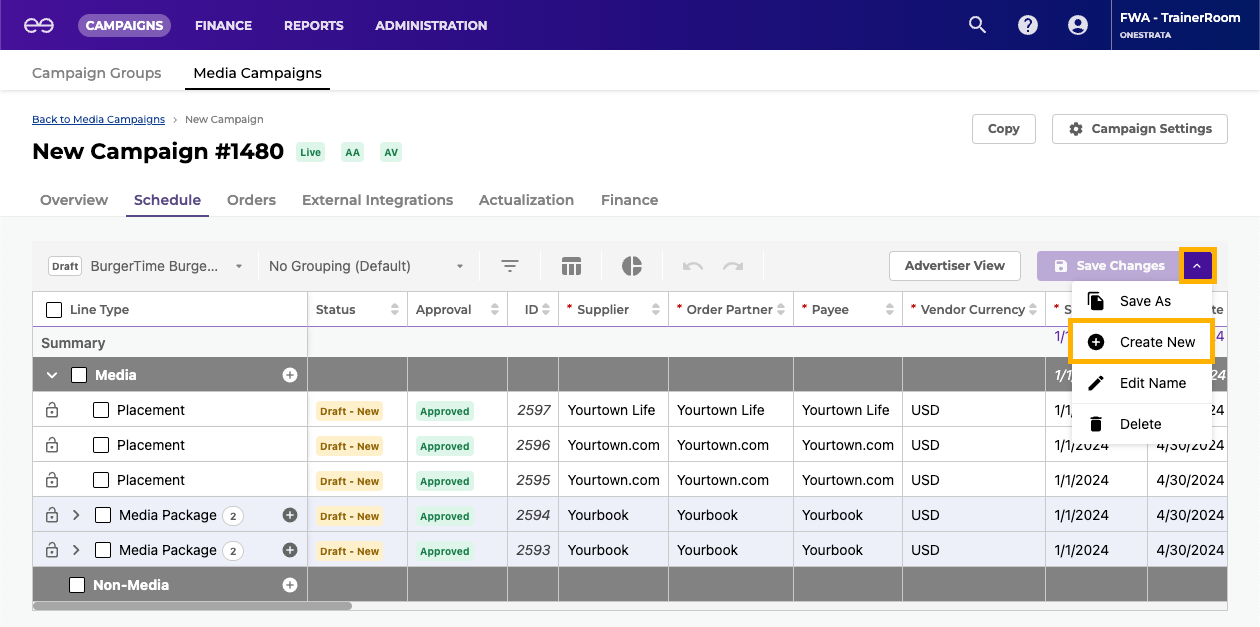
- Click the downwards-facing icon (
 ) next to the Save Changes button.
 - Select Create New.
- In the Create New Schedule window, for Name, enter a name for the new schedule draft option.
- Click Save.
- Build out the new, empty schedule draft option.
Delete a Schedule Draft Option
To delete a Draft schedule option:
- Open the appropriate media campaign.
- Navigate to the campaign's Schedule tab.
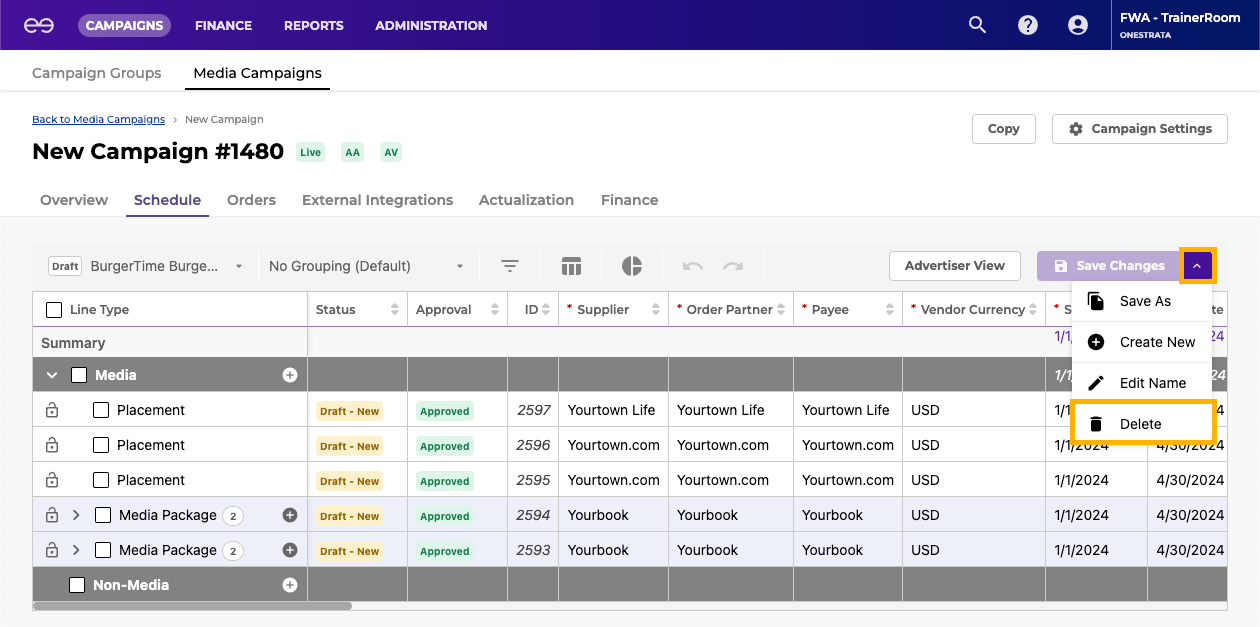
- In the Schedule List, select the schedule draft option to be deleted.
- Click the downwards-facing icon () next to the Save Changes button.
- Select Delete.
- In the Delete window, confirm that the schedule draft option should be deleted by clicking Delete.
Commit a Schedule Line
Committing a line on a schedule indicates that the line is ready to proceed from a planning state to a more financially "committed" state in the campaign management workflow.
Individual lines on the Schedule grid can be committed without committing the entire schedule at once. This allows for individual orders to be sent whenever ready, even if others are not. Revisions can similarly be committed mid-flight, as needed.

To commit one or more schedule lines, do the following:
- Open the appropriate media campaign.
- Navigate to the campaign's Schedule tab.
- Select one or more approved Schedule grid line(s).
- Click the Commit button.
- In the Commit Selected Rows window, click Yes. The status of the successfully committed Schedule grid line(s) changes to Committed.
Effects of Committing a Schedule Line
When schedule lines are committed on the Schedule grid, located on the Schedule tab, OneStrata automatically does the following:
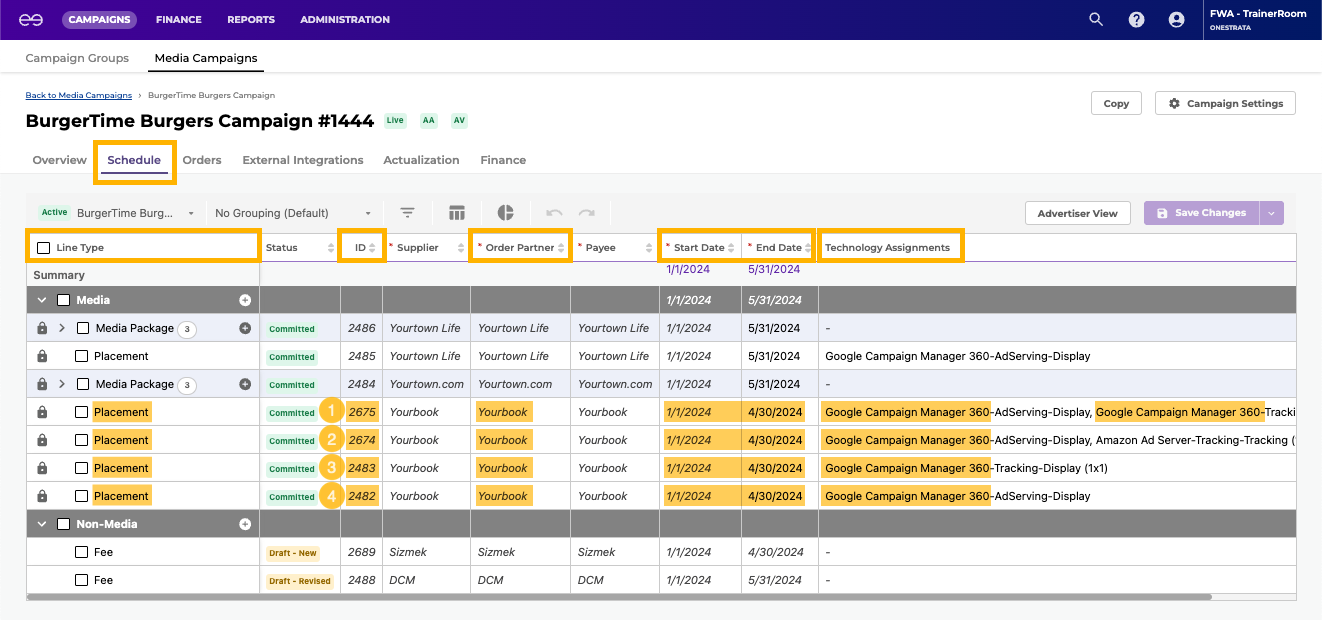
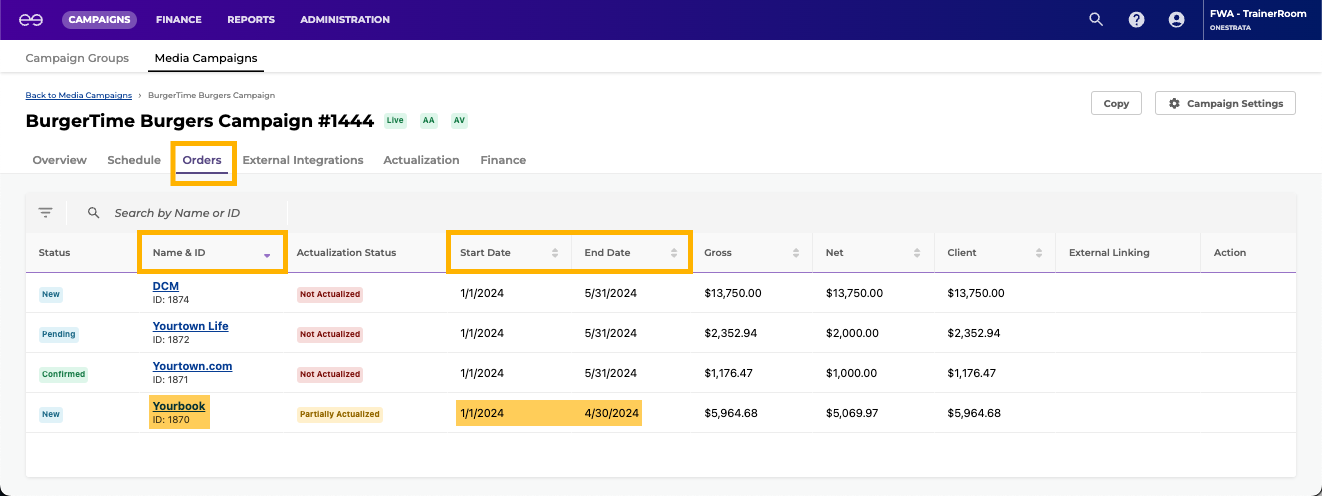
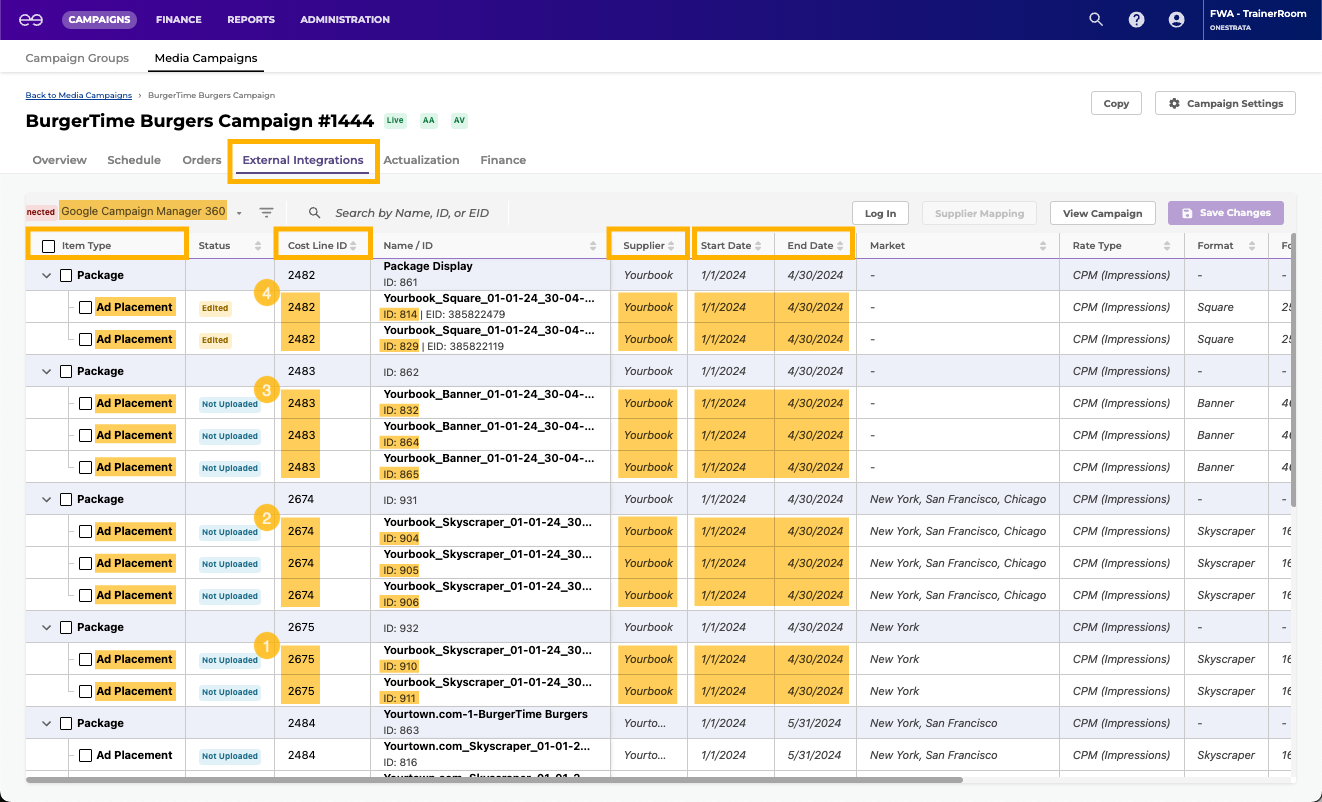
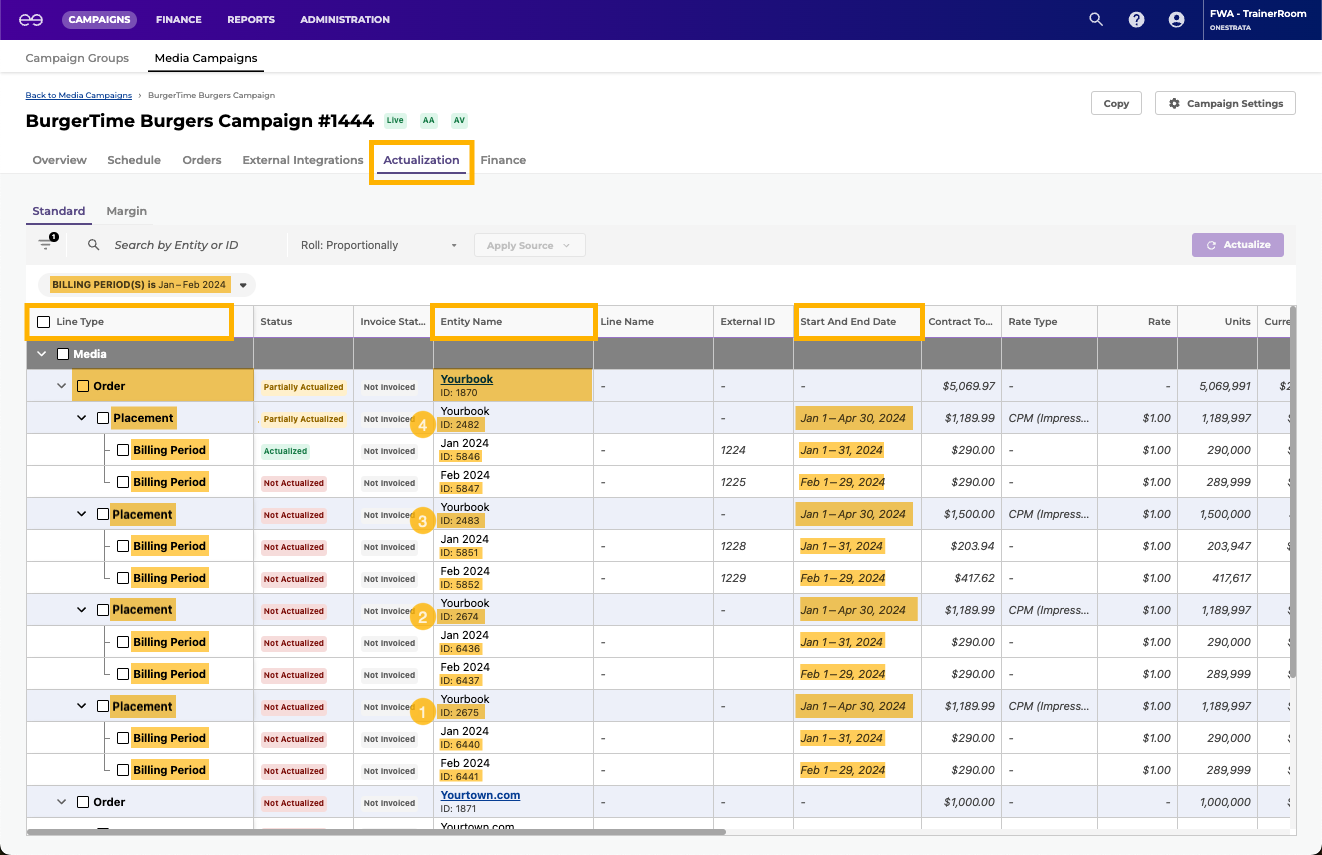
The images below provide an example of how the Schedule, Orders, External Integrations, and Actualization tabs are connected:
| Tab | Description |
|---|---|
| Schedule tab | There are four committed Placement lines with Yourbook as an Order Partner.
|
| Orders tab | The four Placement lines are grouped together into a single order.
|
| External Integrations tab | The four Placement lines have one or more corresponding Ad Placement lines.
|
| Actualization tab | The four schedule Placement lines each have a corresponding Placement line on the Actualization grid. The Actualization grid Placement lines are further broken down into Billing Period lines (the start and end dates of each placement's billing periods are configured on the media schedule, within the Unit Calendar). The order associated with the four Placement lines correspond to an Actualization grid Order line.
|
Cancel a Committed Schedule Grid Line
Canceling a committed Schedule grid line for a campaign that is currently running may have impacts to media activity and costs. If needed, adjust the costs and units of other lines in the schedule before canceling the Schedule grid line.
To cancel a committed Schedule grid line, do the following:
- Navigate to the Schedule tab of the campaign that contains the Schedule grid to be canceled.
- On the Schedule tab, do the following:
- Select the desired Schedule grid line.
- Click the Cancel button. The status of the Schedule grid line changes from Committed to Draft - Cancelled.
- Click the Save Changes button.
- Optional: Depending on Agency or Enterprise settings, changes to a committed schedule may require re-approval. If the Commit button is inactive, re-obtain the necessary approvals before continuing.
- Select the desired Schedule grid line again.
- Click the Commit button to re-commit the schedule and cancel the Schedule grid line. The canceled line is removed from the Schedule grid.
- Select the desired Schedule grid line.
Edit Flight Periods
Changes to a Placement or Media Package line's flight periods are made through the Unit Calendar widget, on the Flight Periods grid.
Change the Flight Period Cost Distribution
To change how a Placement or Media Package's budget is distributed across its flight periods, do the following:
- Open the Unit Calendar widget for the desired Schedule grid line.
- In the Flight Periods grid:
- Click the Cost Distribution dropdown.
- Select the desired cost distribution method.
- Click the Cost Distribution dropdown.
- At the bottom right of the Unit Calendar widget, click the Save button.
Edit the Start or End Date of a Flight Period
To edit the start or end date of a flight period, do the following:
- Open the Unit Calendar widget for the desired Schedule grid line.
- In the Flight Periods grid:
- Locate the desired flight period. If the flight period is locked, unlock it.
- Double-click the Start Date or End Date cell, and select the desired new start date or end date.
Flight periods cannot overlap, meaning that any dates that occur within another flight period (for the same media line) cannot be selected.
- Locate the desired flight period. If the flight period is locked, unlock it.
- At the bottom right of the Unit Calendar widget, click the Save button.
Edit the Units or Cost of a Flight Period
Manually editing the Units or Cost value of a flight period automatically changes the media line's Cost Distribution value to Custom.
To edit the units or cost of a flight period, do the following:
- Open the Unit Calendar widget for the desired Schedule grid line.
- In the Flight Periods grid:
- Locate the desired flight period. If the flight period is locked, unlock it.
- Double-click the Units or Cost cell and enter the desired value.
If the Units value is entered, the Cost value is automatically calculated and filled in, and vice versa. This is because the Units, Rate, and Cost values are linked by a triangulation rule. The Rate value cannot be edited within the Unit Calendar widget, only on the Schedule Grid itself.
- Locate the desired flight period. If the flight period is locked, unlock it.
- At the bottom right of the Unit Calendar widget, click the Save button.
Add a Flight Period
To add a flight period, do the following:
- Open the Unit Calendar widget for the desired Schedule grid line.
- In the Flight Periods grid:
- Click the Add button.
- In the newly created row, double-click the Start Date and End Date cells, and select the start and end dates of the flight period.
Flight periods cannot overlap, meaning that any dates that occur within another flight period (for the same media line) cannot be selected. - Optional: If the Cost Distribution value is Custom, double-click either the Units or Cost cell, and enter the desired value.
If the Units value is entered, the Cost value is automatically calculated and filled in, and vice versa. This is because the Units, Rate, and Cost values are linked by a triangulation rule. The Rate value cannot be edited within the Unit Calendar editor, only on the Schedule grid itself.
If the Cost Distribution is Pro Rata or Even, the Units and Cost values will be automatically calculated and filled in.
- Click the Add button.
- At the bottom right of the Unit Calendar widget, click the Save button.
Delete a Flight Period
To delete a flight period, do the following:
- Open the Unit Calendar widget for the desired Schedule grid line.
- In the Flight Periods grid:
- Select the desired flight period by clicking the checkbox to its left.
- Click the Delete button.
- Select the desired flight period by clicking the checkbox to its left.
- At the bottom right of the Unit Calendar widget, click the Save button.
Export or Import a Schedule
Exporting and importing schedules is only available if the import/export schedule feature is enabled, through the Administration > Application Settings page.
In addition to building a schedule on the Schedule grid, schedules can be built using a schedule import Excel template.
Export a Schedule
Since schedules can have different columns, column orders, and/or custom fields, it is recommended to download a new schedule import template for every campaign.
To export a schedule / to download a schedule import template, do the following:
- Open the desired campaign.
- Go to the Schedule tab.
- Above the Schedule grid, select Import/Export > Export Schedule.
The schedule is exported as an Excel sheet that also functions as a schedule import template. For more information, see Import a Schedule.
Import a Schedule
To import a schedule, do the following:
- For the desired campaign, download a schedule import template.
- Following the instructions on the Instructions worksheet, edit the schedule import template in Excel as desired, keeping the following in mind:
- Since schedule import templates are protected worksheets, sorting rows requires selecting the appropriate rows (excluding the header row) and using Excel's Custom Sort feature.
- Deleting a row in a schedule import template does not cancel the corresponding Schedule grid line, once the template is imported back into OneStrata. Canceling a Schedule grid line must be done directly in the Schedule grid.
- Since schedule import templates are protected worksheets, sorting rows requires selecting the appropriate rows (excluding the header row) and using Excel's Custom Sort feature.
- After saving the changes to the schedule import template, return to OneStrata.
- Above the Schedule grid, select Import/Export > Import Schedule.
- Upload the edited schedule import template.
After importing a schedule via the Excel template, a notification with the results of the import is displayed. The notification has one of the following formats:
| Message Format | Meaning |
|---|---|
| Import Successful - X row(s) imported | All X rows in the Excel template were successfully imported to the Schedule grid. |
| Import Failed - X row(s) not imported | All X rows in the Excel template were invalid and were not imported to the Schedule grid. A row is invalid if the Line Type or Name field is blank. |
| Import With Errors - X rows(s) imported | All X rows in the Excel template were imported to the Schedule grid, but all rows contained a validation error that should be manually fixed. For example, a row contains a validation error if the Cost Category field is blank or incorrectly spelled. |
| Import With Errors - Y row(s) imported, Z row(s) not imported | Some combination of the above. |
Filter Schedule Grid Lines By Status
There are five Schedule grid line statuses:
- Draft - New
- Committed
- Draft - Revised
- Draft - Cancelled
- Cancelled
By default, canceled lines (Schedule grid lines with the Cancelled status) are filtered out and not included on the Schedule grid. However, canceled schedule lines—and any combination of Schedule grid line statuses—can be included by manually adjusting the Status filter.
A manually applied Status filter remains active until one of the following events occurs:
- The current browser tab is refreshed
- The same schedule is opened in a new browser tab
- The Status filter is manually changed again, during the same browsing session
To filter Schedule grid lines by status, do the following:
- Open the appropriate media campaign.
- Navigate to the campaign's Schedule tab.
- In the Applied Filters bar (see Schedule Tab UI Elements, item 6), click the Status filter dropdown.
- Select the desired combination of Schedule grid line statuses.